In this post I’ll show how I make sourdough bread at home. The recipe and technique is an amalgam of Hugh Fearnley Wittingstall (River Cottage Everyday) & Dan Lepard (The Handmade Loaf) plus some other stuff I’ve read online and my own experience.
Stop press: 31st March 2011 I’ve posted an update with some lessons & observations since this was published.
 The post was prompted by a Twitter conversation with Ryan Lewis and Alys Fowler about making sourdough. Alys and I were encouraging Ryan to have a go at making it. I promised to do a ‘How To’ blog to show how simple it is to do.
It’s what I do at the moment and I’m an enthusiastic amateur. There are about as many methods as there are bakers. I’d welcome feedback from anyone who bakes for a hobby or professionally. I like to learn new stuff and I’m sure the comments would help others who come here.
The process of making the loaf takes just under 20 hours. This is essential for the loaf to develop its best flavour and texture. Don’t worry because you’re only doing a little bit of stuff every now and then and the timings are flexible.
Want to find out more? Read on…
How to make sourdough bread
Ok then, here’s the ingredients and method for making two loaves of about 1 kilo (just over two pounds) each. I tend to measure all the ingredients in a jug on a set of scales.
Flours
Before I start a note on flours. Not all flours are equal and you tend to get what you pay for. If all you can get is supermarket own brand stuff then still have a go: you’ll produce something better than standard supermarket bread. If you can get Allinson premium flours – all the better. If you can get flour from millers such as Bacheldre Mill or Shipton Mill or similar then you’ll have something beautiful to work with and you’ll notice the difference in taste & texture.
Sourdough Bread Recipe
Ingredients
For the sponge
200g sourdough starter (see end of post for notes about this*)
500g strong white flour
550g warm water
For the loaf
200g strong wholemeal flour (optional – you can use all white just make up the total weight)
400g strong white flour
20g sea salt (I get unrefined sea salt and grind in a pestle & mortar as I need)
For your proving container
Rye or rice flour a few handfuls
Method
The evening or night before you want to bake make the sponge.
Put the flour and starter in a mixing bowl – it should look like this:
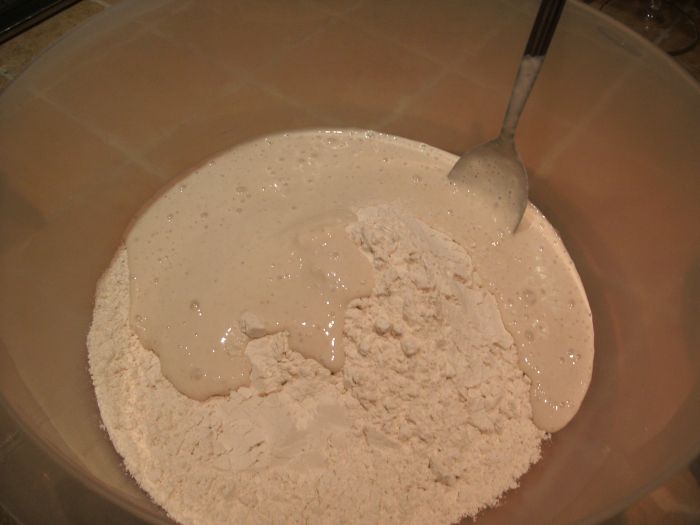 Add the water and mix well so if forms a loose paste.
 Cover with a towel and leave in a warmish place. I tend to put mine next to our woodburning stove where it sits at 20°C (68°F) while the stove is on. During the night it’ll fall to ambient temperature.
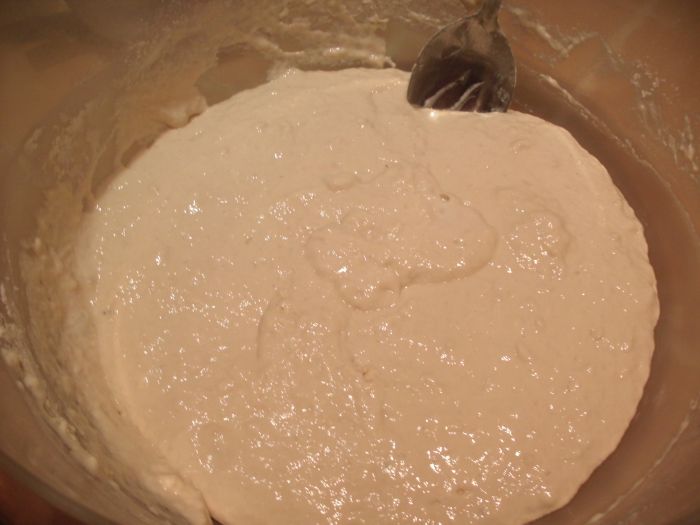
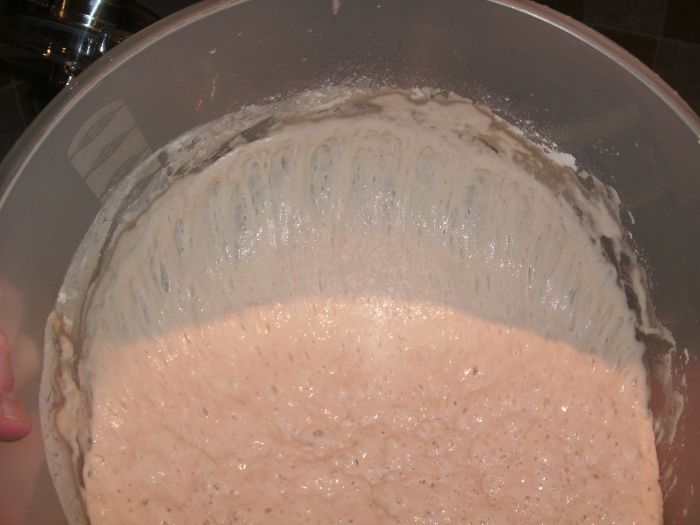
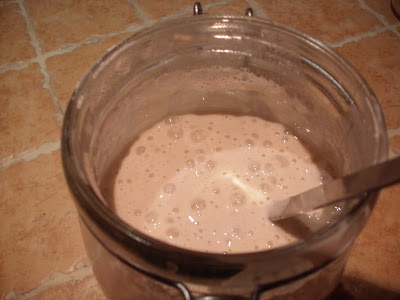
Leave this until the next morning when it should be ‘active’ with bubbles something like this:
 From the picture below, notice how the sponge had formed ‘strings’. This is your dough developing and it’s a good sign.
 The next stage you can do with a machine or by hand. I use a machine because of my dodgy arthritic wrist, doing it by hand means you have a chance to really feel the ingredients and get mucky: the choice is yours. Either way there’s no heavy work to do.
Tip your sponge into the bowl of your machine if you’re using one. If not, leave it where it is.
Take your remaining flour(s) and add to the sponge.
DO NOT add the salt yet.
Mix until combined. You’re trying to get the flour coated in the liquid so the grains of flour can hydrate – don’t bother to ‘knead’. Just mix with the machine or squidge the ingredients through your fingers.
Leave for 10 minutes or so. The reason you leave the salt out is that it affects one of the proteins in the flour so that hydration of the flour is affected. This short wait helps. If you can’t be bothered, just crack on.
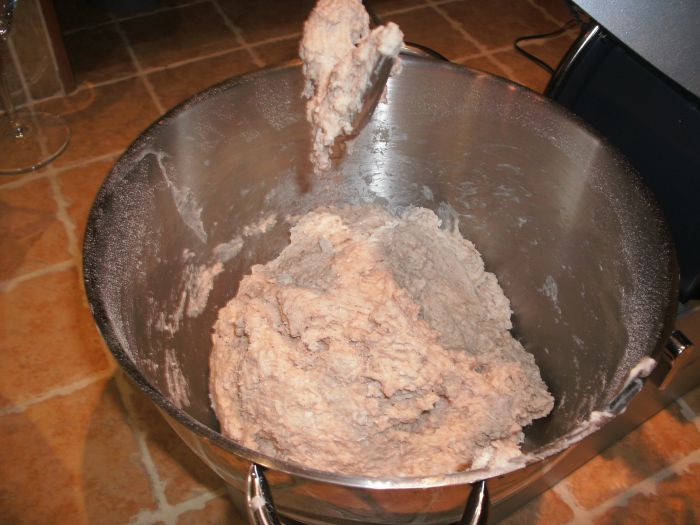
Add the salt and mix/squidge again so that all is evenly distributed.
What you have now is like a grainy putty – you may wonder if it will ever end up as a smooth yummy dough. It will, just be patient.
 Put it into your bowl (which has been cleaned and dried) and cover. To stop the dough sticking to the bowl you can oil the bowl lightly. I use an oil sprayer that is meant to be used for healthy frying – just saves you ending up with very oily hands. You’ll work out your own way.
Cover with a tea towel or oiled plastic bag (so you don’t lose moisture and form a crust). Leave for another 10 minutes or so in a warm place. Then we’ll do our first folding.
First to explain. In many books (including HFW’s) you’ll see a 10 minute knead specified. You can do this and you’ll end up with a good loaf. However, Dan’s book contains a ‘no-knead’ method using folding developed by a French baker in the 70s. This method allows the dough to properly hydrate and it develops a better structure. Also because of the increased time involved, I think you get a better flavour too.
OK, so you’ve waited 10 minutes or so. Take your dough out of the bowl. It will still feel like putty and may be quite sticky. Avoid the temptation to use loads of flour in the next bit, just scrape the dough off your hands if you need to or oil your hands. If you add lots of flour you’ll be putting in unhydrated flour and change the lovely dough you’re developing.
Have a look at this video for the folding technique. (It’s not the first fold I did – it’s about two in, the technique is the same regardless.)
As I said before, it’s not energetic is it? I can’t knead bread in the traditional way because my wrist complains too much. It’s a lovely gentle way of looking after your baby. The folding incorporates air layers and mixes up the ingredients so the yeasts can have some different food to work on.
Pop back into your bowl and cover again.
Do the folding again in 20 minutes.
Do the folding again in another 30 minutes.
Do the folding again after 1 hour.
Do the folding again after 1 hour.
Do the folding again after 1 hour.
Then let the dough rest for an hour or so before you shape it.
The timings are not precise. I often get sidetracked and an hour turns into 75 minutes, or need to to something so it’s 45 minutes. Don’t fuss! Whatever you can do, when you can do it will help.
The next video shows the shaping technique I use. I put the dough in bannetons which are lovely to use and give a real ‘artisan’ look. You can use any bowl lined with a close weave tea towel sprinkled with rye flour to stop the dough sticking.
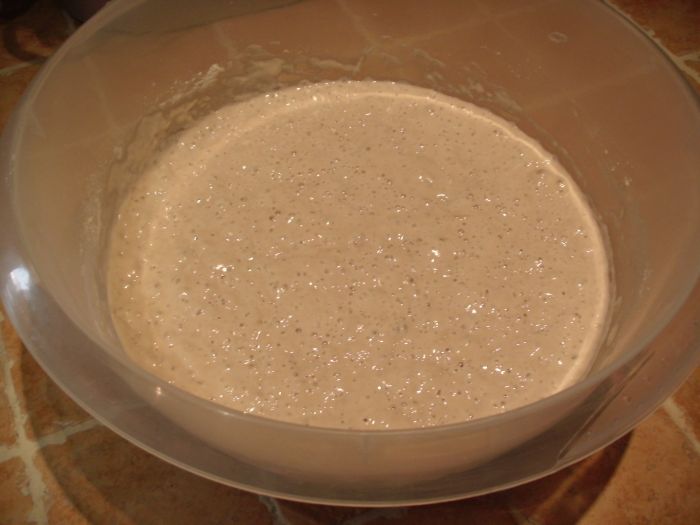
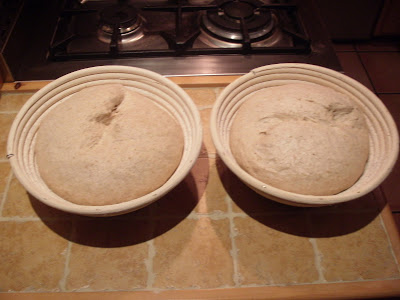
Cover the dough with your towel or oiled plastic and leave to prove in a warm place for 4-5 hours.
The dough will approximately double in size. Here it is after the proving period.
 Depending on how long your oven takes to heat up, get it to it’s hottest so it’s ready for the end of the proving period. If you have it, a baking stone or pizza stone in the oven will help. If not, just leave a baking tray in there to heat up. A hot something to put your dough on will help give it a nice crusty bottom and nice ‘spring’ so it rises well.
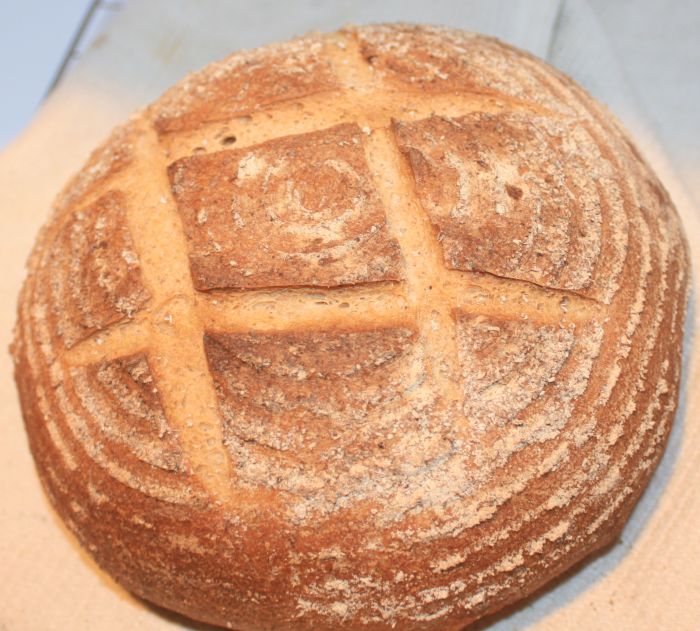
When you’re ready take a loaf to the oven and take out of the oven your stone or tray. Turn the dough out onto the stone/tray and slash the top. This will help the rise by reducing the surface tension on the top of the loaf – and it looks nice. You can cut a cross, a circle or a noughts & crosses pattern (see at the top) or what you like. I use a professional grignette, a serated knife like a bread knife works too. Here’s a cross slash:
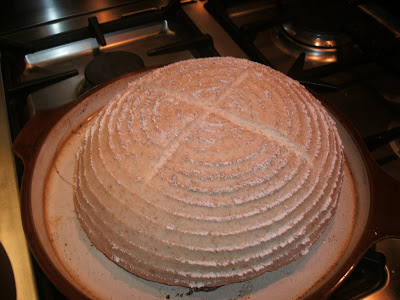 You’ll see that the dough holds up by itself. The protein with bubbles is nice and strong.
Pop it quickly in the oven. You can spray some water in if you like which will help the rise or ‘oven spring’.
Turn the oven down to 220°C (425°F, GM7) and cook for about 20 minutes. Then turn the oven down to 200°C (400°F, GM6) and cook for another 10-20 minutes or until the loaf sounds hollow when you knock the bottom with your knuckles. The actual time will depend on the precise nature of your oven and the temperature it maintains. The acid test for cooked is a good hollow sound when you knock it.
You should end up with something a bit like this.
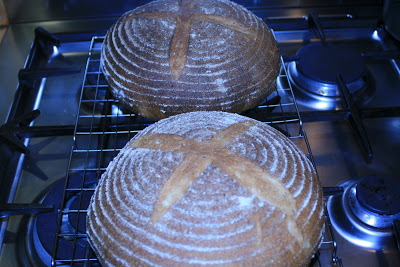 Pop the sourdough loaves onto a cooling rack and wait with anticipation until they are cool enough to eat. Feel proud that you have created something natural and wonderful with some flour, water and your own hands.
Let me know how you get on – I’d love to see pictures and consumer feedback.
Edit 16th January 2011
In the comments Ed asked to see the crumb of the loaf, here it is:
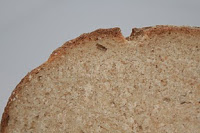 The crumb is a bit tight. See the update for reasons why and how to make it better.
* Sourdough starter
Really there’s no magic about this, a sourdough starter uses wild yeasts naturally on the flour (or other ingredients used) to start a ferment. There are instructions in Hugh Fearnley-Wittingstall’s and Dan Lepard’s books. Hugh’s is a flour and water starter and Dan’s contains currants or raisins & live yoghurt which are strained out once fermentation has started. I’ve tried both and had success with Dan’s. My Twitter friends Ed & Marieke (fabulous bakers) have a flour only method.
I keep my starter in a 1000ml kilner jar I bought from ASDA for £1.00. Here it is bubbling nicely:
 There’s a useful discussion about how easy it is to keep a starter going on the TheBakeryBits Blog. I get much of my baking kit from Patrick at BakeryBits who is also on Twitter.
Comments
17 responses to “How to make sourdough bread”
[…] wanted to do another post about making sourdough bread. Since my first How To Make Sourdough post and the Update, I’ve learnt quite a lot and continue to do […]
Hi Mitch
So glad the recipe and method worked for you and you had fun too.
It would be well worth your while reading the update, although you've done brilliantly without.
For others, here's Mitch's bread and beautiful cob oven:
Mitch's Buns, bread and oven
Cheers
Carl x
Hi Carl!
What an exciting day. Followed this guidance to the letter until late morning when Merlin fired up the pizza oven, couldn't resist trying some rolls although I had only folded twice. They held their shape quite well on a floured tray and had nearly an hour to rise, but in the oven they just shot up. Burned crust but amazing vertical holes inside.
Dashed away for the afternoon and rest of dough over-proved in basket, with hindsight could have baked it at lunchtime too.
Have not yet read your Update, this recipe worked so well even with less folds. The weather is warm which must help.
Most of all everyone likes the flavour, a first for my sourdough attempts.
Thank you so much for giving instructions that have worked well for me! Might go and read the update now… Oh, pics on Instagram, under Mitchdafish. Not able to create link at mo.
Mitch
Hi Jeannette
Welcome and thanks for taking the time write something.
Funny that we've worked to similar methods in our exploration.
I used to use all wholemeal in the loaf but wasn't getting the rise I was looking for. I experimented by going down to 100% white and then building the wholemeal up. The percentage in this recipe is the optimum for us for our 'everyday' loaf: this is the daily bread.
North Wales is just beautiful to live in, so glad we chose to come here. I think we're closer to Ireland than England, often we can see the Wicklow Mountains on the horizon.
Cheers
Carl
Hello Carl, I just found your most informative blog this afternoon and as I also use a combination of DL's and HFW's recipes and methods I found it extra fascinating! Going through your steps and video's was almost as though I was doing it myself, I also include some wholemeal flour in my mix because I like it although I don't always measure out how much I put in, but it always turns out good. Another coincidence, I am also in N.Wales but on the other side, NE, nearer to England. Jeannette.
Hi Ryan
Thanks for having a go and letting us know how you got on. It's a really fun project to be involved in and you've created a truly awesome loaf there: loads of people are, rightly, very impressed.
I thought I'd help by putting your links in html to make them clickable, here they are:
Ryan's Loaf – whole
Ryan's Loaf – crumb
So what next?
Cheers
Carl
Hi Carl,
A massive thank you for creating this incredibly detailed post. I don’t think I could have made a loaf without those instructions, especially the videos.
Today I managed (somehow) to make my first sourdough loaf with the very lively starter that Alys sent me. Strange thing is – it actually worked and the loaf looks really quite good! Don’t get me wrong I knew that with yours and Alys' words of wisdom I was sure to make something that had the basis for eventually becoming bread but in my hands I thought a first effort would be rather pitiful. In fact, I’m over the moon with the end result!
The loaf itself can be found over on my blog: http://www.ryansgarden.co.uk/p/image-of-day.html and I have also posted (as requested) a picture of the crumb (I feel like an imposter using such a specialist term): http://picasaweb.google.com/lh/photo/8EvBjMzw-G1JR1H8BEM8E52Yu1JSBUX9cqW0Ngd0jw4?feat=directlink
Thanks again for helping a novice out and I look forward to trying out a few more recipes in the near future!
Ryan
Hi Mick
I really appreciate your kind comments
You've given a really useful insight into your method and process for producing bread for sale.
It's fascinating how many ways there are to produce bread with the same basic ingredients.
Thanks for your feedback
Baking on!
Cheers
Carl
Hi Carl
That’s a beautifully clear and well presented description of bread making. You’d have to try pretty hard to get it wrong if you were baking a loaf using it.
As you say, there are as many ways of making bread as there are bakers. Personally I keep my starter at 100% hydration and usually, instead of making a sponge, refresh it at a ratio of 1:1:1 by weight (starter, water, flour) about eight hours before making the final dough. Because I’m baking for sale I mix in the evening, and the dough ferments overnight in the fridge at about 2C. After scaling, the doughs have a preliminary rough shaping, a short intermediate prove of about 25 minutes, then they are shaped and prove in the baskets for about three and a half hours.
In my case, the salt goes in at the start with the other ingredients. If I’m hand kneading (and I do a lot of hand kneading) I do it in the conventional way (stretching the dough away from me, quarter turn, stretch again). As soon as the ingredients come together as a dough, I knead it ten times, rest it a few minutes and repeat the operation twice more. That’s all. The dough goes straight into the fridge and there are no folds before it gets scaled.
Bake on!
Mick
Mrs R
Always a pleasure to cook for good people that appreciate it. Thanks for your kind words. More bread on the way…
Hi Joanna
Thanks for your comment.
Working my way onto the blogs – so much to read & learn. Will de-lurk shortly 🙂
Hi Carl, Love your blog, and your bread, I'm one of the lucky people that have actually been fortunate enough to be able to test it. It tastes as good as it looks, just fabulous.
You've got the gift!
Hi Carl, great post – I recognise the Dan Lepard style here, it was my starting point also and works beautifully, when in doubt, I always revert to this. Though as I got a little Kenwood I have been using that for some of the bread I make. I love his kneading method, very easy on the wrists as you say! Do you post on Dan's forum too?
In the Tartine Bread book Ed is reading it's again a different story with very small amounts of sourdough starter and long rise times like yours. All very interesting. Well, ultimate goal for every baker is to bake the bread he or she likes best (be it super sour, big holes, fluffy white or creamy crumb).
Hi Ed (& Marieke)
Many thanks for taking the time to read & comment. I'll deal with your interesting points in turn.
Folding
I first came across this in Dan Lepard's The Handmade Loaf (Mitchell Beazely 2004, pp18-19). He says that stretching, then patting the dough into a rectangle before folding elongates the bubbles and changes the handling of the dough for the better. Also, this increases the surface tension of the proteins holding the gas allowing the loaf to sit upright without slumping.
The second reference to this was in Allam & McGuiness's Bourke Street Bakery: the Ultimate Baking Companion (Murdoch 2009, pp30-31). They recommend you press out into a rectangle (which is what I do). They say this redistributes temperature and the food for the yeast supply & 'activates' the gluten. Allowing some gas to escape before it breakes the structure of the dough means the dough is stronger.
It seems to me, that the big difference between my folding and your folding (say for the high hydration dough) is whether there is a stretch of the dough involved. I don't know whether, empirically the protein in the dough reacts better to one method or another to achieve the effect you're after. Perhaps some testing would be in order?
Starter
All the books I've referred to in the blog use this quantity of the starter. Having re-read the method in your recipes, I think the main difference is how we make the preferment.
You seem to put a small quantity of the starter culture into the flour/water for the preferment. Dan, Hugh et al (and I) use a good slug of the starter culture. I guess the only difference would be in the speed that the preferment gets going given the different volumes of active starter. Clearly, because of your beautiful results, the small quantity works.
I also guess that the exact quantity of starter culture used isn't critical. As long as there is sufficient to activate the food in the flour it will 'get away'. What may be more important is the question of the starter's contribution to overall water content. I'm not hugely scientific with how I maintain my starter. When I refresh it, I take about half out and then add a mugful of flour (about 100g, 4ozs) and a shy mugful of water (about 150ml, 5fl ozs). I adjust water content in the mixer if I think it's not wet enough, judging by the 'feel' of the dough.
Proving time
Again, this is as recommended in the books I have. Being a tad impatient, I did try shorter rise times of 1.5 to 2 hours and found that the dough did not rise as well. As a result, the structure was not as good and I also found that the sourdough taste was not as pronounced. The proved structure you see in the photo above just out of the bannetton and slashed is with a full 4 and a bit hour prove. However, it's been pretty cold here of late. Even on the bench by the woodburner the temperature is only in the low 20s C with a humidity of about 70%. Could it be that your average proving temperature and/or humidity is higher?
High hydration dough
As I said on Twitter, I'm planning on doing your 80% dough this coming week. Watch the blog for results.
Thanks so much for the feedback.
In answer too Edwin. I use Bechaldre Mill rye for my sourdough and prove it for about 4 to 6 hrs, depending on time of year and temperature. Have had no problems with over proving.
Hi Carl,
We both read your post with interest. Great to see another baker so involved. Lots of work, writing, pictures, movies!
There are a few things we noticed that are quite different from how we make our types of bread. The main one being your folding. We have never seen it done like that. Could you tell us how you came by it? The other thing is the amount of sourdough you use. It seems like a lot. We use about 15 grams per loaf. Also a bit surprised by the proofing for 4-5 hours. With our (rye)sourdough culture this would lead to some serious over-proofing (it normally is about 1.5 hours). This is just to tell you what we noticed, not that there would be anything wrong if it leads to a great tasting loaf. One more suggestion would be to try and work with some higher hydration dough and see how you like that. We are people who love those kinds of breads (big crusts, creamy crumb, some holes)so that is why we tend to go for wetter doughs. You could try our sourdough mini boules recipe and see if you like that type. (you can also make 2 loafs instead of 6 mini boules with it).
Would also be nice to see a picture of the inside of the bread. Always like to see that crumb 🙂