I’ve been keen to make ‘proper’ french baguettes for years now. At last I’ve found recipes and techniques that work. There’s still room for improvement as I’m learning as I go.
All ‘high hydration’ means is that there’s relatively more water in the dough than a lower hydration dough: ‘wetter’ doesn’t sound so glamorous. More water means that the dough is stickier to handle, softer (closer to a batter), rises faster and has more holes. Hydration is expressed as a percentage weight of water to flour. So the bread in the last post on sourdough was about 55%: middling wetness.
In this post I’m describing two recipes: one with 65% and one at 80% water. Wet wetness.
Baguette 1 – Semi-sourdough 65%
There’s a bit of back story with this one. I was desperate to play with my T55 Flour from Shipton Mill. However, other work during the day meant it was getting on for 16:00 and so, if I wanted to make baguettes that day, I couldn’t go through lengthy preparation overnight or even during the day.
So I thought I’d take a chance and make up a recipe for a bread that was part sourdough for flavour, and part yeasted for speed. I didn’t check any of the books for this recipe, so if any ‘proper’ bakers read this and the technique is not recognised then no one else is to blame. Suffice to say, it worked.
The T55 flour is made from French Wheat, ground fine. This gives it a light open texture, that ‘French’ flavour you may recognise from proper French bakers’ baguettes and a crisp crust.In the US, I’m told that the best equivalent is All Purpose flour.
Ingredients
For the sponge
10g (1/2oz) dried yeast
10g (1/2oz) sugar
150g (6ozs) warm water
50g (2ozs) T55 flour
For the sourdough starter
150g (6ozs) starter
50g (2ozs) rye flour (rye ‘gets away’, starts fermenting, quicker)
50g (2ozs) warm water
For the baguettes
950g (2lb 6ozs) T55 flour (the remainder of my 1kg packet)
525g (1lb 5ozs) warm water
10g (1/2oz) salt
Method
In a jug or bowl mix up the ingredients for the sourdough starter and set aside in a warm place for 20 minutes to 1 hour or so. Longer is better, mine hadn’t really got away very far and I would have given it longer if I’d the time. Make sure you use a container that has room for frothing up. (See my comment at the end of this recipe for thoughts on this)
In a jug or bowl whisk up the ingredients for the sponge and set aside in a warm place for about 20 minutes. Make sure you use a container that has room for frothing up.
At the end of this time, put your remaining flour in a bowl, or in the bowl of your mixer if you’re using a machine, and then add all the other ingredients. Mix just until the ingredients are thoroughly together and then turn out onto a floured surface. Here’s where the fun starts…
There’s no kneading to speak of – it’s a stretch and fold. Here’s famous baker and author Peter Reinhart showing how it’s done.
Do this stretch & fold initially for 2-3 minutes one S&F after the other. The dough will begin to firm up – honest. You can use your dough scraper to get under the dough and pull it out and then fold over.
Cover it with an oiled plastic bag and let it rest for 15 minutes
Do two stretch and folds.
Cover it again with an oiled plastic bag and let it rest for 15 minutes
Do one stretch and fold.
Now here you could do another couple or so of rest-stretch-folds. I was on a time limit so that’s all I did.
At the end of your stretch and folds, let it rest (‘bench rest’) for 10 minutes and then divide the dough into roughly four equal parts. You could weigh if you felt so inclined.
Shape your rounds into rough rectangles about 100-150mm square (4-6 ins) and then ‘roll’ them into cylinders. I say ‘roll’. Depending on how the dough is, this could be flop. Use your wet scraper if you need to.
Let rest for 15 minutes.
Now would be a good time to pre-heat your oven to its highest setting. You may need longer if you’re using a baking stone.
Do the final shaping. With the palms of your hands (oiled or floured as needed) roll the cylinders out into thinner cylinders like you see on the video at the beginning where they show the book. You’re shaping and tightening up the dough. You need to roll them to a length that will fit in your oven.
Next you’re going to leave them to prove a little before baking. And you need to put them on something they won’t stick to. Close weave cotton tea towels will work (not ‘furry’ ones), or you can get professional couche from my friends at Bakery Bits. I improvised. My tea towels are not really big enough and the couche is on my present list below more bannetons. I’ve got some big heavy duty oven cloths and these worked just brilliantly. See them here from Nisbets catering equipment.
So when you’ve made your baguette shape pop them onto your cloth which you’ve well floured (ideally with rye or similar which sticks less). Do it like you see at the beginning of the video: they need support at the sides.
Leave for 25 minutes.
Then roll each loaf onto your chosen baking medium. I used metal trays lined with ‘Bake-o-Glide’ with two loaves to a tray. Slash the tops with a grignette, razor blade or very sharp knife with small vertical slashes down the middle of the loaf (I did left to right slashes and since been educated!).
Pop into your oven (I put them on my baking stone) and spray some water inside.
Bake for 25 minutes until brown and wonderfully crispy on the outside.
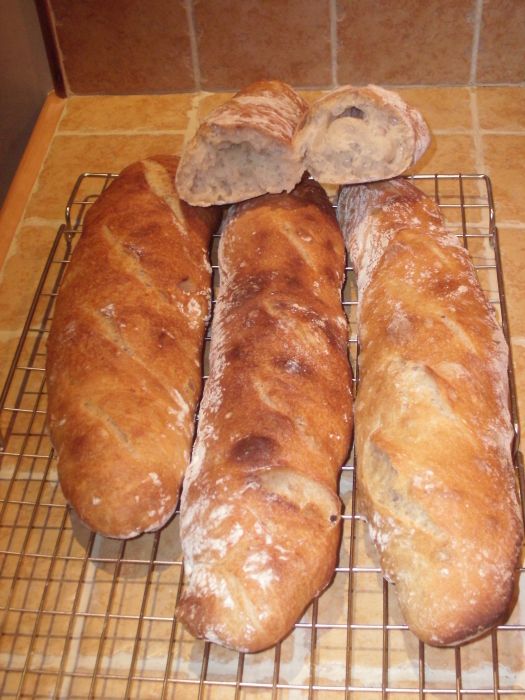
The crust was lovely and crispy, the bread had that ‘French’ taste and was soft & chewy at the same time with good holes in it. To be honest, we were delighted with the outcome. An authentic looking and tasting loaf. I’m not sure that the sourdough flavour really came through. I think that the starter would have needed much longer to develop. I’m going to do some more research and come back to sourdough baguettes at a future date.
Baguette 2 – Yeasted 80%
For this one I followed the recipe of Ed & Marieke ‘The Weekend Bakers’ here. All the links on that page are well worth following up on – it’s very instructive indeed.
The dough was definitely more challenging to handle. I didn’t find the early stretch & folds too bad to do. The dough defintely improved and got a lot bigger as I worked it.
However, I found the shaping stages much more difficult and this is reflected in the final results.
I still slashed the dough left-right: it wasn’t till after that Ed told me about the straight slash. Of course, if I’d read his blog information properly – I would’ve already known that – doh!
Here’s the result out of the oven:
The loaf to the left was cooked in the my second (non-fan) oven. I tried an experiment to try and get steam which didn’t work. I put a wet ‘cartouche‘ over the bread to make steam. It dried out very quickly and served to stop some of the ‘oven spring’ that makes the bread rise. Hence the flatter loaf. I tried: and won’t do it again!
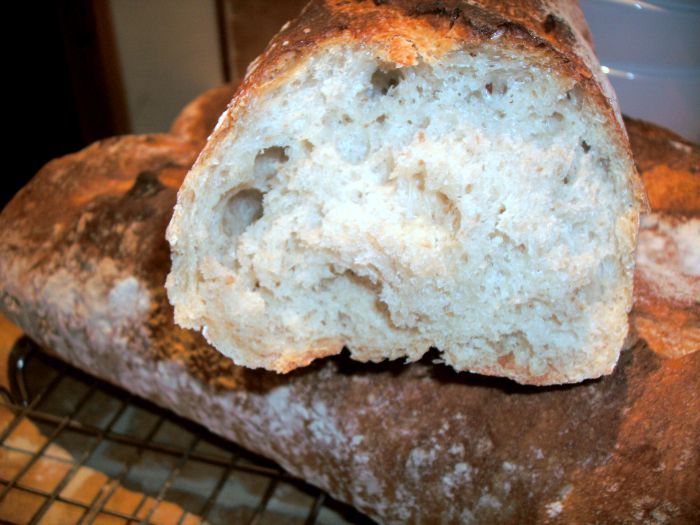
And a better look at the crumb:

It’s a much more holey crumb than the first. The crust was crisp and yummy and the insides moister and chewier than the 65%.
Next time I’ll try ‘The Weekend Bakers’ recipe except with a 75% hydration to see what it handles like and how the crumb and taste are affected.
Comments
10 responses to “French baguette – high hydration bread”
Hi Catherine
Thanks for popping by and for the feedback. Nice to know I'm working in the right direction.
I think part of the trick is just practice and knowing what the dough feels like and what it will end up like.
Cheers
Carl
Well done. This is an authentic French bread (last picture) with "mie aérée" or holey crumb 🙂
Thanks for sharing your recipe.
Cathy
French Course Angel
Carl, thank you and don't worry about my 00 question – it was idle curiosity really. Having been on one of Andrew Whitley's courses I wouldn't dare use 00 and I guess was wondering if T55 has as much of the bran taken out as the 00 had.
@Choclette
Thanks for your comment. I agree the first ones looked more 'baguette-like'. The higher hydration loaves didn't stand up as well when proving. Perhaps I need to work the dough a bit more. Will try next time.
As you say, there really isn't enough rye in them to affect the colour much. If you were able to look at the real thing (you can't, we've eaten it) you would see small flecks of rye flour in the crumb.
The French wheat for T55 flour gives a different flavour: like the 'proper' French baguettes you taste in France. I need to do some forum searching to find the comparison with Tipo '00'. I understand the French flour is less 'strong', that is it has a lower protein content than typical UK 'Strong White' for instance. The strong flours can creat the high rise loaves and the French/Italian creat the baguettes and ciabattas when coupled with high hydration.
I asked Jeremy Shapiro in New York (Stir the Pots) what the US equivalent was to T55 and he said 'All Purpose'which would indicate that the T55 and 00 are not too disimilar. I will check…
@Simon
Thanks for coming by and for posting an interesting comment.
It's a common technique to do a hybrid. I'm not sure that my first recipe is a good example of how to use the technique. I did it without any real research. Ideally, I'd have given the sourdough longer to develop 'fizz-and-flavour'.
Teresa Greenway at Northwest Sourdough is an expert exponent of the use of roasters or dutch ovens to intensify the effect of steam. See here: Steam Baking at Northwest Sourdough and she has a link to a very good YouTube Video at the end of the post.
As you can see, I don't mind relevant links – we're all here to learn.
Thanks for your time and for following me on Twitter.
Hi Carl – I arrived here through reading your exchange with Ryan & Alys on Twitter and as one who is newish to "proper" bread found your experiments fascinating.
I've encountered the same dilemma as you, wanting sourdough bread but without the time to prepare for it & similary have used starter for flavour but a faster live yeast to provide a kick. It's not perfect, but still works very well.
Another trick I've tried recently is to use what is effectively a Dutch oven (in my case a large casserole dish) in which to bake the bread. This method retains moisture in the loaf by baking it in a more humid environment. If you haven't tried it it is well worth ago on both sourdough & conventional bread doughs.
I know it's not the done thing to promote one own own stuff on anothers blog but this is a pic. of what I mean.
http://yfrog.com/h4knyuj
Another interesting post Carl. Attempt no 1, the semi sourdough way looked most like a French baguette to me, but I'm no expert. Interesting that they looked so white. I would have thought with some rye flour they would have had a darker colour, but I guess there wasn't much there. I don't use white flour for bread baking, so am rather ignorant about it and am going to ask some potentially dumb questions. Is T55 the same sort of thing as Italan 00? What is special about French wheat?
Hi Joanna
I'm practising on kitchen towel inners and toilet rolls. It gets me some strange looks – but no real change there then.
I'm going to have a good look round Mellow B's and the other forums – thanks for the kind welcome there.
See you soon
Hi Lobma
Thanks for your kind comments. I've been called many things, but never 'Ben'.
Our wire fence for our chickens is standard 900mm. They can, and do, jump this: but not often. I think they jump when they see something 'better' than what they have. SO if they have plenty to keep them interested where they are meant to be you'll mostly be ok. You will need to keep an eye on them.
We tuck them away at night. We have the usual amount of foxes around and we have pole cats too.
Willow for firewood is another issue. There are a lot of variables: species, site & soil and the type of stove you are burning in. In some places willow is burnt as biomass and is chipped and fed into the stove by automatic hopper. You can also make faggots for burning by putting smaller bits of willow together. And then there is short rotation coppice where you grow the willow to wrist thickness to burn.
Your question has prompted me to do a review of the willow in another post soon. If the weekend is dry I'll take some pictures and explain species and length of time to grow so you can see what I'm talking about.
I love living here – it IS beautiful.
I do know Hen – she commented on the willow post you mayhave read.
Take care and good luck.
They look beautifully crusty! Slashing baguettes is not easy in my book and mine are still hit and miss. Can I make a suggestion, sounds weird, but if you draw out a whole stack of baguette shapes on a piece of paper and then with a pencil practise where you are going to slash, then your hand will learn the moves. The trouble is that in the excitement of getting the bread ready to go in the oven, with the best of intentions it all goes a bit awry and even though you intend to slash straight down at an angle etc etc you end up slashing across. Least that's what happens to me time and time again. One other tip, is to have a little bowl of water to hand and dip the blade in it between slashes if you find the dough is dragging or sticking as you slash. Paul has uploaded some little videos on the Mellow Bakers site of Hamelman slashing baguettes which is pretty clear, and there is also the wonderful le petit boulanger site which has the best slashing videos ever. Lovely to see your post on Mellow B's by the way. I have to go and slump on the sofa now, but see you soon ! Joanna
Hello Ben
I've just found your blog. So lovely too, and inspiring. That baguette looks just mouth watering. We will have to make it.
We have turning our garden into a forest garden at present (although we've been organic for years). We are getting hens too, our neighbour breeds them). Have you any thoughts on what would the optimum height for a wire fence? We'll let them go free range in the garden, but keep them in at night.
Also, if I can pick you brain s some more. How long does it take for willow to grow, enough to use as firewood?
UI used to live in West Wales, and miss the place so much. You area is another wonderful place to be. It’s the woods and streams I miss moast from Wales.
Do you know of the wonderful Hen, over at Heart and Soil? She’s another deeply inspiring being.
Take care
Lobma